To
discover the content of this blog visit the "summary" page.
Introduction
First of all I would like to
apologize for my imperfect English, please be indulgent.
I decided to dedicate my blog mainly to the
techniques of digital art in order to render a little that the web
have given me in this area. But the Anglophone community
of internet has also helped me a lot, so I thought that enlarging my audience to this
community would be a just reward.
Here is a very appetizing apple (photo found on the web) that I intend to reproduce with Adobe Illustrator (CS5).


The main drawing of the apple
To begin I draw a circle with the Ellipse tool (L by pressing the Shift key while drawing) as follows (the arrow shows the center of the circle):
then ... I
detail the contour by
adding points with
the pen tool (P) to
match the photo (taking care to minimize the number of points):

Once satisfied with the result I
duplicate it (and keep it for future use) to make it
matching the contour of the front of the
apple:

Then I select different
colors on the picture using the
eyedropper tool (I) to create
a gradient of 6
colors (15 ° angle) like this:
·
Location 0%, RGB = 228, 43, 22· Location 32%, RGB = 199, 21, 28 (Distribution: 50-50%)
· Location 47%, RGB = 192, 11, 28 (Distribution: 50-50%)
· Location 64%, RGB = 159, 19, 28 (Distribution: 50-50%)
· Location 84.5%, RGB = 159, 19, 28 (Distribution: 50-50%)
· Location 100%, RGB = 102, 30, 22 (Distribution: 50-50%)

It may be noted on the
photo that the lighting gives more
clarity on the lower part of the
apple. That is why, to
make this light effect, I'll use 3 paths with gradients of lighter
colors and moderate with
strong Gaussian Blur. The first path is a 4-color gradient (15 ° angle and Gaussian Blur of 20 pixels):
·
Location 0%, RGB = 244, 174, 156
·
Location 32%, RGB = 222, 105, 66 (Distribution:
50-50%)
·
Location 83%, RGB = 180, 78, 64 (Distribution:
50-50%)
·
Location 100%, RGB = 200, 152, 142 (Distribution:
50-50%)

The second path (under the first) is a same gradient colors (15 ° angle and Gaussian blur 5 pixels):

The third path (under the second) is a same gradient colors (15 ° angle and no Gaussian blur to
affirm the color at the bottom):

Of course, a clipping mask, with the contour of the original
path, will hide the Gaussian
blurs beyond the contour.
The result is encouraging, but does not reflect the dark side of the upper right part of the apple. For this I use a gradient mesh as below, darkening the desired part and leaving the rest with light colors. Then I place the gradient mesh above the main path with
Transparency "Darken".
Previous 5 paths form a group to which feather 3 pixels are used:

The light reflection from the lighting is
reproduced with the three paths below, color RGB = 248, 215, 204:

Three other lines of
the same color will allow enhancing
the clarity of some parts
of the fruit. All six paths will
be Gaussian blur 5
pixels and under clipping
mask for the
same reasons as seen above.

· Location 17.6%, RGB = 228, 43, 22
· Location 62%, RGB = 159, 19, 28 (Distribution: 60-40%)
· Location 100%, RGB = 102, 30, 22 (Distribution: 76-24%)

Other paths are briefly
described below:

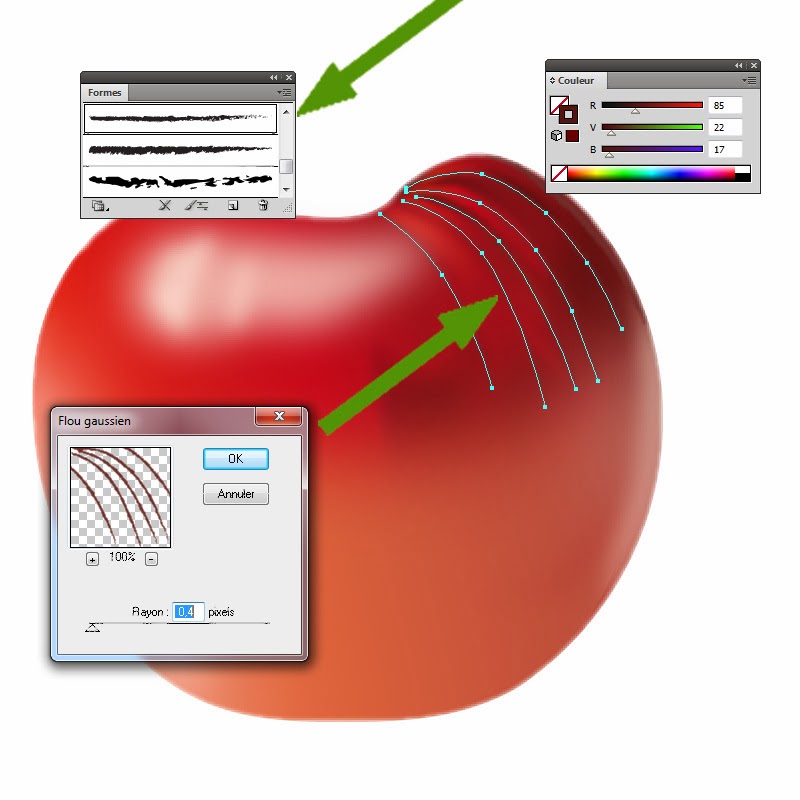
The dark lines
are drawn with a contour of 0.5 pt., brush "Pencil - Feather" (taken
from the standard library of art forms), RGB color = 85, 22, 17, Opacity 25%
and 0.4 pixel Gaussian Blur:
Multicolored marks on the skin are two paths with
a contour 2 pts., brush "Chalk" (taken
from the standard library of art brush), color RGB = 241, 143, 82, Transparency "Overlay", Opacity 80% and feather 2
pixels:

The effects of rough skin of the apple are realized with different paths taken in the form of standard libraries Illustrator. Here are described some of these paths:
Example #1: simple line of 2 pts., brush "Chalk - Scribble", color RGB = 85, 22, 17, Transparency "Overlay", Opacity 40%:


Example #6: simple line of 1 pt., brush "Dry Brush 3", RGB = 246, 172, 109 color, Transparency "Normal", Opacity 100%:


All these paths are
placed under the clipping
mask to delete
the unwanted effects.
To translate the orange points
which are all over the skin of
the apple, I use a small point (see arrow) color RGB = 245, 157, 61 and I create a new
Scatter Brush (simply by dragging the path in the Brush
window) with the following options in the user form
for creating the brush:
· Random Spacing, variation from 760% to 846%,
· Random Scatter, variation from -1000 to +1000%
· No Rotation

Then, I create simple lines (1 pt.) as below, with the newly
created brush, Transparency "Hard Light" and 0.5 pixel Gaussian Blur:

Now, the front portion of the apple is completed and it
is necessary to draw the
rear part. For this, the path placed
in reserve at the beginning (see above) is used to obtain the
complement (rear portion of the apple) color RGB =
199, 21, 28:


· Location 0%, RGB = 92, 17, 14
· Location 22%, RGB = 116, 19, 22 (Distribution: 50-50%)
· Location 60.5%, RGB = 159, 19, 28 (Distribution: 50-50%)
· Location 100%, RGB = 192, 11, 28 (Distribution: 50-50%)


Example #1: simple line of 1 pt., brush "Charcoal - Feather", color RGB = 231, 69, 27, and 0.5 pixel Gaussian Blur:


Example #3: simple line of 0.5 pt., brush "Chalk - Scribble", color RGB = 247, 209, 122 and Opacity 100%:

Example #4: simple line of 1 pt., brush "Charcoal - Tapered", color RGB = 245, 157, 61:

Example #5: simple line of 1 pt., brush "Charcoal - Tapered", color RGB = 251, 196, 116:

Finally, the orange points over the backside are made as seen above (0.5 pt simple lines, Opacity 80% and 0.5 pixel Gaussian Blur):

It remains to draw
the stem of the apple with
the following 4 tracks:
Path #1: color RGB = 138, 59, 25 and feather 2
pixels:
Path #2: color RGB = 174, 93, 24 and
feather 2 pixels:


· Location 49%, RGB = 239, 142, 56
· Location 100%, RGB = 185, 101, 26 (Distribution: 31.5-68.5%)

The shadows
The shadow below the apple is made with a path
of color RGB = 43, 28, 25, 2 pixels Gaussian Blur and feather 4 pixels:
The shade under the apple (due to lighting) is a blend (option 30 steps) with two paths:
Path #1: color RGB = 85, 22, 17 and
feather 4 pixels:
Path #2: white color (RGB = 255, 255, 255) and
feather 4 pixels:

And the final result is
that shown at the beginning of this post (see above).