To
discover the content of this blog visit the "summary" page.
This post is a
continuation (Part 2) of the post "portrait of a top
model Lancôme".
Eyes and eyebrows
This post is the
continuation (Part 2/2) of the first
already published “portrait of a top model Lancôme
part 1/2”.
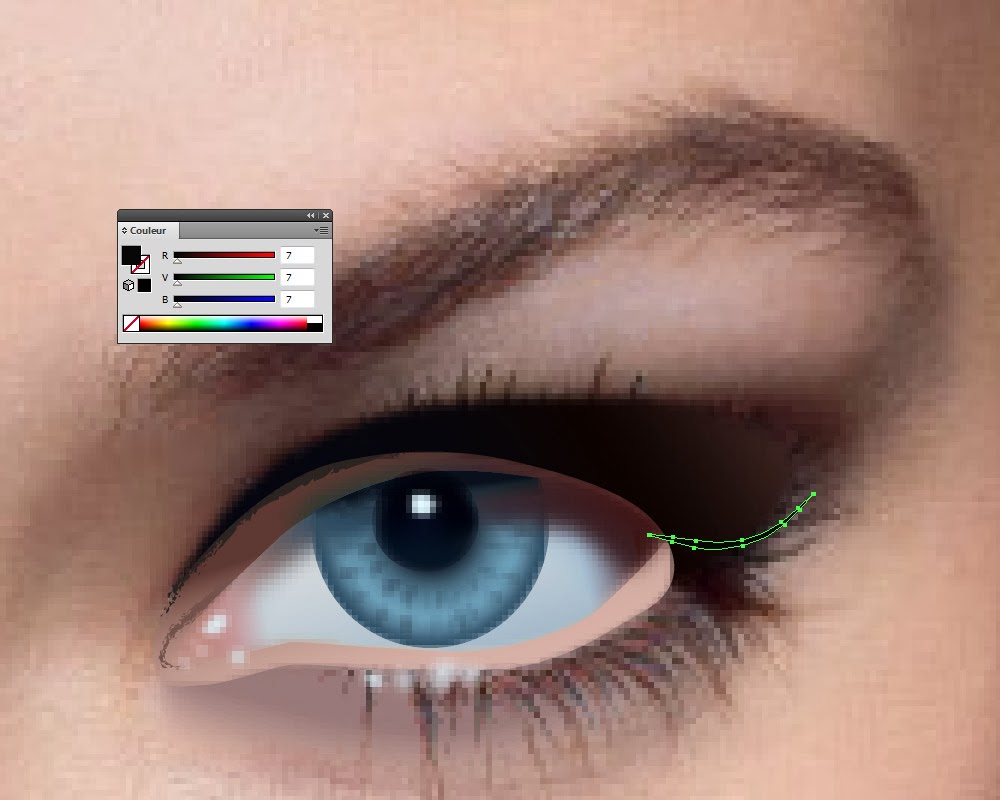
The next step is drawing the eyes and eyebrows, part often difficult to restore the authenticity of the look. You can see the eyes in this picture which include the following
items:
·
The eye with the cornea,
iris and pupil
·
The light
reflections and shadows
·
The
eyelid
·
Eyelashes
·
Eyebrows
The eye
My approach to draw the
eyes is always the same. If you want to see the details of my technic
read the post "draw an eye".

First I draw the cornea that I fill with a linear gradient (variable depending on the case), with the colors in the
eye taken with the pipette tool (here 7 colors angle = 12 ° and feather 3 pixels):
·
Location
0%, RGB = 185, 130, 122· Location 4,3%, RGB = 185, 130, 122 (Distribution: 50-50%)
· Location 10,3%, RGB = 194, 146, 149 (Distribution: 50-50%)
· Location 17,6%, RGB = 194, 205, 212 (Distribution: 50-50%)
· Location 48,5%, RGB = 227, 227, 224 (Distribution: 36-64%)
· Location 81%, RGB = 167, 191, 212 (Distribution: 66-34%)
· Location 93%, RGB = 61, 19, 18 (Distribution: 57-43%)

Here I decided to
accentuate the blue shade at the bottom of the eye (see arrow) with a path
(feather 2 pixels, Transparency "Darken") with a linear gradient of 2
colors (105 ° angle):
·
Location
12,4%, RGB = 155, 178, 197· Location 100%, RGB = 227, 227, 224 (Distribution: 34-66%)

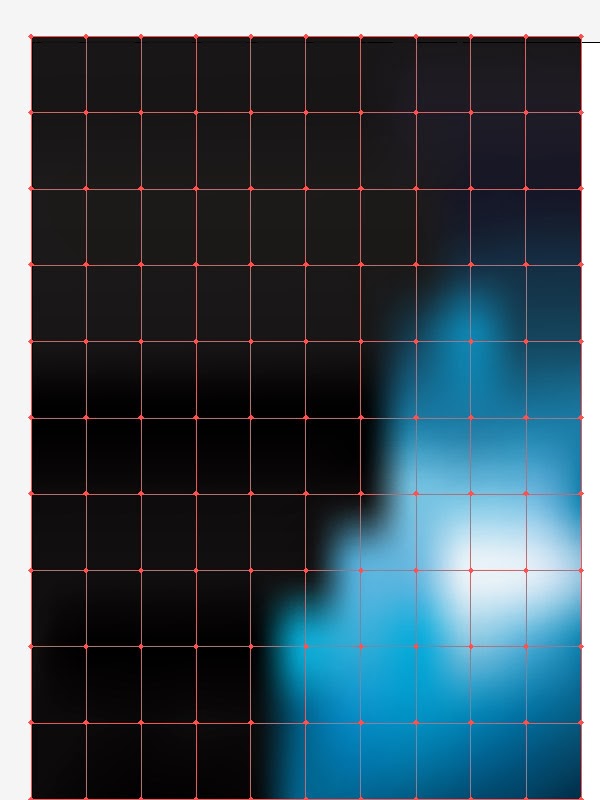
Then I draw the iris using the tool "ellipse" that I filled with a radial gradient of 4 or 5 colors taken with the pipette in the eye of the subject (here 4 colors, feather 2 pixels, 0 ° angle and size pixel 105.8%):
·
Location
31,3%, RGB = 9, 16, 26· Location 74,6%, RGB = 109, 156, 180 (Distribution: 33-67%)
· Location 86%, RGB = 82, 117, 138 (Distribution: 59-41%)
· Location 97%, RGB = 42, 73, 95 (Distribution: 41-59%)

You probably
noticed that the top of the iris is darker near the eyelid and that is why I
duplicate the iris path to fill the second over the first with transparency
"Darken" and a linear gradient of 2 colors (angle = -83.5 ° and
feather 2 pixels):
·
Location
33,4%, RGB = 9, 16, 26· Location 74,6%, RGB = 109, 156, 180 (Distribution: 24-76%)

Then we have to resize the iris within the cornea.
To do this, I duplicate the path of the cornea and the two are selected
together (iris and cornea), I use the "pathfinder" tool option "crop". This provides a good size of the iris into the cornea (you can also use a clipping mask).

We also resize the dark iris path the same
way.

You'll also observe that the iris is
filled with grains of dark or light colors. To
make these disparities I use
several techniques, but most
often it is the one described below.
I creates two blends
with a curved
line and optional gradient
= 12 steps, one
inside and one outside, with small ovals filled with
gradient’s values the same as iris (see above)
but here linear,
feather 2 pixels:
Blends are with transparency "Overlay" and Gaussian
Blur of 0.3 pixel as shown in close-up below:

Here is the
first blend:

And the second one :

Gaussian Blur of 0.3 pixel is applied together.
Then you draw the pupil circle black (RGB = 0, 0, 0) that is converted into gradient mesh (optional) and 2 pixel feather I positioned after disabling display.
At this stage, the eye is too perfectly clear and the cornea should be modified by effects of light and shadow.
Here, due to the
very vertical lighting, the cornea is darkened by the eyelid. That is why I use
a path with a linear gradient filled by colors taken with the pipette in the
eye of the subject (here 4 colors, Gaussian Blur 1.5 pixels, -125 ° angle and
transparency "Darken"):· Location 0%, RGB = 61, 19, 18
· Location 61,8%, RGB = 42, 73, 95 (Distribution: 47-53%)
· Location 82,4%, RGB = 118, 98, 96 (Distribution: 49-51%)
· Location 100%, RGB = 189, 150, 151 (Distribution: 49-51%)

The eyelid
The design of the eyelid consists in bring out the dark shadows of the upper side and the lighter areas at the bottom. Behind the cornea I draw a linear gradient of 2 colors (angle = -71.6 °) with feather 2 pixels:
·
Location
27%, RGB = 91, 56, 49· Location 100%, RGB = 214, 177, 167 (Distribution: 13-87%)

The makeup of the upper edge of the eye is a simple line (Charcoal - tapered, 0.5 pt) dark color (RGB = 91, 56, 49) as below:

A second linear path (Charcoal - tapered, 0.75 pt) darker color (RGB = 11, 3, 0) is used to enhance dark areas.

The makeup of the eyelid is a linear gradient path of 3 colors (angle = 33 °, Gaussian blur of 0.8 pixel) as below:
·
Location
0%, RGB = 4, 6, 14· Location 67%, RGB = 11, 3, 0 (Distribution: 75,5-24,5%)
· Location 100%, RGB = 69, 43, 39 (Distribution: 61,5-38,5%)

The light reflections and shadows
The shadow underneath the eye is a blend, transparency "Darken", consisting of 2 paths:
The first is filled of color (RGB = 149, 119, 119), feather 3 pixels as shown below:
The second is
a simple path of color RGB = 226, 188, 171 and
feather 6 pixels.

For light aspects 3 clear areas can
be discerned.
The first zone is on the pupil, a first path light (RGB = 225, 247, 255) and Gaussian Blur 0.3 pixel:
And a second path of the same
color and Gaussian Blur 0.5 pixel:

Then the second area is at the corner of the eye, several paths filled with light color (RGB = 225, 247, 255) and Gaussian Blur 0.5 pixel:

Finally, the third area is on the edge of the cornea, several paths filled with light color (RGB = 225, 247, 255) and Gaussian Blur 0.5 pixel:

The lashes
Upper lashes are
made using a simple line (size 1 pt.) with profile width 4 then decomposed
(Object-Expand ...) in order to be able to color (RGB = 7, 7, 7):
Then arranged on the eyelid as shown below:

The shadow of the lashes at the corner of the eye is made up of identical paths with a linear gradient of 2 colors (angle = 60.5 °) as shown below:
·
Location
22%, RGB = 32, 5, 12· Location 100%, RGB = 91, 18, 28 (Distribution: 13-87%)

The eyelashes of the lower eyelid are made with the same technique but otherwise colored (RGB = 11, 3, 0):

Shadows are lighter (RGB = 91, 56, 49):

Then couples (eyelash and shadow) are
arranged in the eye as shown below:

Then we intensify
the gradient mesh of the face in
order to integrate more efficiently the eye:

The eyebrows
For eyebrows, I begin by defining the area of maximum density and materialized by a path. Then I create a new symbol from a path (size 1 pt. profile width 5, color RGB = 145, 83, 55) in order to create a set of symbols with the "Symbol
sprayer" tool as shown below:

Then duplicating the result and following the contours of the eyebrows by adapting the size and layout we
obtain a dense layer over the entire area:

It ends with the
creation of some symbols to make it more realistic drawing eyebrows:

Here is the final result:

And here's the overall result:

Hair
The technique I use to draw the hair is always the same and I think it is original because I do not have found it on any tutorials website. If you want to see the details of my
technic read the post "draw hair".
I'll use "symbol" tools and I begin drawing a path (regardless of color) with a very thin thickness (0.25 pt.), which has the shape of the chosen hair.
Then I decompose the path (Object-Expand ...) in order to fill it with a linear gradient of 2 colors (angle = 180 °), trying to keep hair color on the picture as below:
·
Location
37%, RGB = 48, 34, 25· Location 100%, RGB = 139, 81, 67 (Distribution: 62-38%)

Then I create a new symbol (for this, simply drag the path in the "symbols" window). Therefore it is possible to use the new symbol by selecting the "Symbols
Sprayer" tool as below:

By duplicating the initial
set of symbols as many times as necessary, we can
fill the desired contour with
the hair as follow:

To achieve the result below, I created a second
symbol adapted to hair on the sides of the
face:

Once finished the left part of
the hair, simply duplicate the group of
symbols and apply Object-> Transform-> mirror for the right
side:

Finally, we get this:

The decor on the background of the
design is obtained with a mesh gradient:
And the final result is this:

Aucun commentaire:
Enregistrer un commentaire