To discover the content of this blog visit the "summary" page.
Introduction
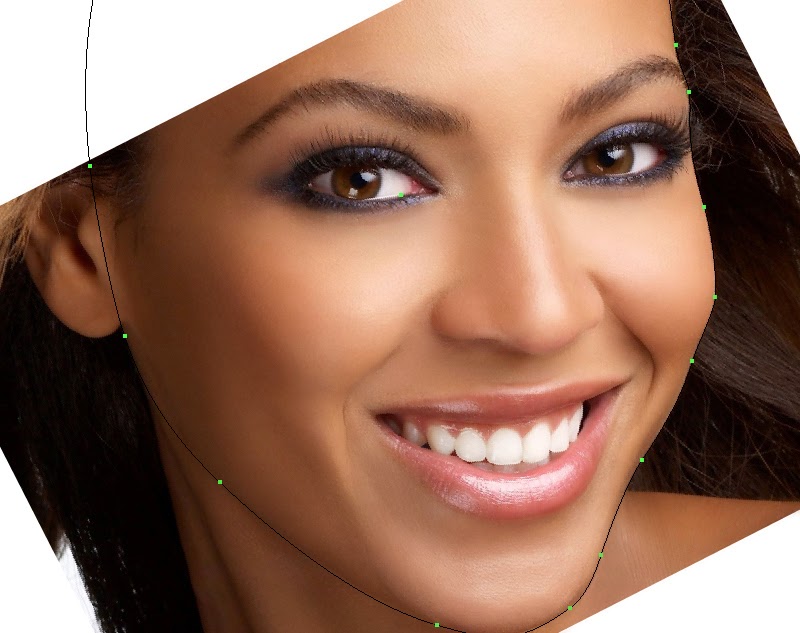
Here
is a very nice close-up portrait of
Beyoncé (photo found
on the internet) that I intend to
reproduce with the Adobe Illustrator (CS5).

Face
As you probably noticed, the face is tilted, and in this case, if you have read my
previous posts, I recommend straightening the image horizontally before starting to work with objects as gradient meshes. For a more detailed
description of the method read the post "draw a face".
As advised in that post, I tilt the face photo before starting drawing. I find the correct angle by successive adjustments with the Object-Transform-Rotate tool
(here I drew a horizontal guide to facilitate adjustment and the result is a 27° angle).

To draw the face I'll use
a gradient mesh and first,
I draw an ellipse with the
Ellipse tool (L) that I filled with a color taken
in the middle of the face (here RGB = 244, 198, 166):

Then I draw more precisely the outline
of the face as shown below:
I usually start with a gradient mesh of 10 x 10 points (100 points) and the density of the net
will be increased thereafter gradually when required.
Then simply use the picture to reproduce colors in each point of the net to give a first result shown below:

Neck
The neck is
also a combination
of a gradient mesh and color gradients placed behind the face of
course (feather 4 pixels):

Linear
gradient of 2 colors (angle =
23.5 °) as described below (green
arrow):
- Location 53%, RGB = 33, 12, 5
- Location 100%, RGB = 69, 36, 17 (Distribution: 25-75%)

For more information read the post "Notation for color gradients".
The neck muscle is highlighted with this track RGB color = 46, 18, 8
and Gaussian Blur 3 pixels:

Linear
gradient of 3 colors (angle = 15 °), described below:
- Location 12%, RGB = 182, 123, 91
- Location 31%, RGB = 187, 125, 96 (Distribution: 50-50%)
- Location 100%, RGB = 133, 71, 44 (Distribution: 52-48%)

The
result is
as follows:

Ear
I
continue by drawing the ear
very roughly on
the upper part because I will not
need more details. It starts with a gradient mesh as below:

Then, without detailing all the objects in the drawing of the ear, I describe below
that of the orifice of the ear canal
with a blend (8
steps) with the following two paths:
·
path
#1 of color RGB = 35, 3, 0 :

·
path
#2 (green arrow) of color RGB = 97, 50, 37 and Gaussian Blur 3 pixels (red
arrow shows the dark side will be clipped later):

Clearest lobes (green
arrow) are also blends and the dark spot
is a linear gradient of 3 colors:

Mouth
The
next step is the drawing of the mouth
(at this stage, I often draw the nose, but here
mouth seems to me
more useful). If you want to see details of my technique for drawing the mouth see the post "draw a mouth".
Lips
To
draw the lips I use a blend
(here option: 15 steps),
starting with the upper lip, with the following two paths:
Path #1: a linear gradient of 5
colors (angle = 15 °, Feather
3 pixels), described
below:
- Location 0%, RGB = 115, 57, 44
- Location 45%, RGB = 153, 67, 61 (Distribution: 69-31%)
- Location 70%, RGB = 151, 63, 55 (Distribution: 52-48%)
- Location 88%, RGB = 193, 105, 87 (Distribution: 57-43%)
- Location 100%, RGB = 161, 89, 67 (Distribution: 50-50%)

Path #2: a linear gradient of 4
colors (angle = 15 °, Feather
3 pixels), described
below:
- Location 0%, RGB = 114, 65, 50
- Location 38%, RGB = 186, 103, 83 (Distribution: 50-50%)
- Location 70%, RGB = 193, 105, 87 (Distribution: 52-48%)
- Location 100%, RGB = 208, 123, 97 (Distribution: 57-43%)

For
the lower
lip (under the upper lip),
I also used two paths
to create a blend (option:
15 steps).
Path #1: a linear gradient of 5
colors (angle = 15 °, Feather
3 pixels), described
below:
- Location 0%, RGB = 116, 54, 52
- Location 31%, RGB = 194, 117, 108 (Distribution: 50-50%)
- Location 55%, RGB = 210, 110, 106 (Distribution: 52-48%)
- Location 88%, RGB = 194, 117, 108 (Distribution: 50-50%)
- Location 100%, RGB = 77, 30, 20 (Distribution: 57-43%)

Path #2:
a
linear gradient of 5 colors (angle = 15
°, Feather 3 pixels), described below:
- Location 0%, RGB = 135, 55, 55
- Location 31%, RGB = 158, 83, 70 (Distribution: 50-50%)
- Location 55%, RGB = 184, 87, 82 (Distribution: 52-48%)
- Location 87%, RGB = 198, 108, 92 (Distribution: 50-50%)
- Location 100%, RGB = 77, 30, 20 (Distribution: 65-35%)

The
area between the lips (the bottom of the mouth) is a linear gradient of
4 colors (angle = 15 °) as
described below:
- Location 0%, RGB = 82, 11, 9
- Location 24%, RGB = 26, 1, 0 (Distribution: 50-50%)
- Location 63%, RGB = 123, 36, 19 (Distribution: 35-65%)
- Location 100%, RGB = 26, 1, 0 (Distribution: 50-50%)

Teeth
The
upper part
of the gum is a linear gradient of
5 colors (angle
= 15 °, feather 3 pixels), described
below:
- Location 0%, RGB = 64, 15, 10
- Location 13%, RGB = 138, 58, 51 (Distribution: 50-50%)
- Location 47%, RGB = 185, 104, 91 (Distribution: 67-33%)
- Location 72%, RGB = 152, 67, 54 (Distribution: 50-50%)
- Location 100%, RGB = 185, 104, 91 (Distribution: 50-50%)

Each
of the upper teeth is made with
2 paths (only one
example is described below):
The
first is
a linear gradient
of 3 colors
(angle = 5
°, feather 3
pixels), described below:
- Location 7%, RGB = 201, 173, 154
- Location 37%, RGB = 233, 212, 200 (Distribution: 40-60%)
- Location 98%, RGB = 244, 227, 219 (Distribution: 47-53%)

The
second is a linear gradient of 3
colors (angle = -88 °, Feather 3 pixels and
transparency "Darken") described below:
- Location 0%, RGB = 201, 173, 154
- Location 33%, RGB = 233, 212, 200 (Distribution: 40-60%)
- Location 98%, RGB = 255, 255, 255 (Distribution: 30-70%)

The
lower part of the gum (near the
teeth) is a path of color RGB = 205, 148, 130 and Gaussian blur 2
pixels:

The part at the bottom is a plot of color RGB
= 162, 93, 75 and 2 pixels Gaussian Blur:

The lower teeth are drawn with simple
paths, for the example chosen,
a linear gradient
of 3 colors
(angle = 0
°, feather 2
pixel), as described below:
- Location 11%, RGB = 162, 106, 91
- Location 64%, RGB = 200, 147, 140 (Distribution: 46-54%)
- Location 100%, RGB = 183, 132, 136 (Distribution: 68-32%)

A first result for the mouth is given below, but it lacks the reflections that will highlight the
relief of light.

Reflections on the lips
For light reflections on the lower lip I use different
paths.
The first path is filled with color RGB
= 216, 124, 115, Gaussian
Blur 4 pixels.

The second path is filled with color RGB
= 254,
204, 201, Gaussian
Blur 4 pixels.

Horizontal light streaks on the lip are paths (here
2 times x 5 lines), thickness 0.5 pt.,
and same color as before, brush "Charcoal - Thin"
and feather 2 pixels:

Vertical dark streaks are paths of RGB
color = 216, 124, 115 (green arrow), thickness 0.25 pt.:

The
different light reflections are made with paths of color RGB
= 254, 204, 201 (green arrow), thickness 0.25 pt., transparency
"Soft Light",
Opacity 50% and brush "Chalk":

Another
clear reflection
is made with a path of color RGB = 254,
210, 208 (green arrow) transparency
"Soft Light" and Gaussian Blur
4.2 pixels:

The back of the mouth is made darker with a
path filled with a linear
gradient of 2 colors (angle
= 15°, transparency "Darken" and Gaussian blur 2 pixels):
- Location 36%, RGB = 74, 19, 14
- Location 100%, RGB = 132, 66, 63 (Distribution: 48-52%)

For light reflections on the upper lip I use the
same technique.
In
order to light the upper part of the upper lip, I use the same path that was used for the blend previously and I apply a linear gradient of 4
colors (angle = 15 °, Gaussian
Blur of 2 pixels),
describe below:
- Location 0%, RGB = 192, 126, 98
- Location 31%, RGB = 192, 126, 98 (Distribution: 50-50%)
- Location 70%, RGB = 240, 184, 162 (Distribution: 52-48%)
- Location 100%, RGB = 240, 184, 162 (Distribution: 57-43%)

The
light reflection
is enhanced with a path filled with
color RGB = 254,
204, 201 (green arrow) and Gaussian blur 2 pixels:

The
bright traces are made with the
same technique for the lower lip
(green arrow) and lights on
the gums are paths
with color RGB
= 254, 204, 201 (red arrow), brush "Ink Spatter #3 "and opacity
40%:

The
bottom of the lower lip is also cleared
with a linear gradient of 4 colors (angle = 15
°, Gaussian Blur 2 pixels and Feather 3 pixels), described below:
- Location 0%, RGB = 178, 122, 94
- Location 31%, RGB = 173, 82, 68 (Distribution: 50-50%)
- Location 55%, RGB = 193, 92, 79 (Distribution: 52-48%)
- Location 100%, RGB = 219, 166, 139 (Distribution: 50-50%)

And
here is the
final result for
the mouth:

In order to
better integrate the mouth on the face, the
density of the net was increased (see arrows) and the face is with feather 4 pixels:

Nose
As
usual, I draw the face with
another gradient mesh and in order to have a net
of good quality I start by drawing an Ellipse (green arrow) with the
Ellipse tool (L):

Then, I add points on the
ellipse to better
match the path with the contours
of the nose (green arrows):

The mesh gradient is made as usual with a
mesh density which is increased subsequently
as necessary:

I
often materialize
the future locations of the mouth, eyes and
eyebrows that are coming to cover
the nose and hide some connections with
the face.
The
drawing of the nose is finalized with the
right nostril (green arrow) with a linear gradient of 2
colors (angle = 81 °, 1 pixel Gaussian blur and
feather 4 pixels), as described below:
- Location 0%, RGB = 154, 94, 66
- Location 100%, RGB = 124, 64, 48 (Distribution: 85-15%)

The
lobe of the right nostril is reinforced with a linear gradient of 2
colors (angle = 63 °, transparency "Darken" and Feather 3 pixels), described
below:
- Location 0%, RGB = 121, 63, 43
- Location 100%, RGB = 237, 177, 149 (Distribution: 25-75%)

The
left nostril path (green arrow) is a linear gradient of 2
colors (angle = 81 °, 1 pixel Gaussian blur and
feather 7 pixels), as described below:
- Location 0%, RGB = 154, 94, 66
- Location 100%, RGB = 124, 64, 48 (Distribution: 85-15%)

The path of the nose is "cut" with a clipping mask as shown below:

If
we overlay
the 2 nets (see below),
we can see that the integration will not be given a satisfactory result (red and green arrows).

This problem is solved with tightening the net of the 2 gradient meshes
(face and nose).

Part 2 of this post is here...
Aucun commentaire:
Enregistrer un commentaire